CentOS7 安装FastDFS+nginx

1. 先查看有没有安装gcc,FastDFS是C语言开发,编译依赖gcc环境

[root@localhost ~]# gcc -v
bash: gcc: 未找到命令...
#安装gcc、libevent、perl
[root@root ~]# yum install gcc-c++
[root@root ~]# yum -y install libevent
[root@root ~]# yum install perl

2. 解压libfastcommon

[root@root opt]# cd fastDFS/
[root@root fastDFS]# ls
fastdfs-nginx-module_v1.16.tar.gz FastDFS_v5.05.tar.gz libfastcommonV1.0.7.tar.gz
#解压libfastcommon
[root@root fastDFS]# tar -zxvf libfastcommonV1.0.7.tar.gz
[root@root fastDFS]# cd libfastcommon-1.0.7/
[root@root libfastcommon-1.0.7]# ls
HISTORY INSTALL libfastcommon.spec make.sh README src
#编译
[root@root libfastcommon-1.0.7]# ./make.sh
#安装
[root@root libfastcommon-1.0.7]# ./make.sh install
mkdir -p /usr/lib64
install -m 755 libfastcommon.so /usr/lib64
mkdir -p /usr/include/fastcommon
install -m 644 common_define.h hash.h chain.h logger.h base64.h shared_func.h pthread_func.h ini_file_reader.h _os_bits.h sockopt.h sched_thread.h http_func.h md5.h local_ip_func.h avl_tree.h ioevent.h ioevent_loop.h fast_task_queue.h fast_timer.h process_ctrl.h fast_mblock.h connection_pool.h /usr/include/fastcommon
[root@root lib64]# cd /usr/lib64
[root@root lib64]# ls libfastcommon.*
libfastcommon.so
#拷贝到32位环境中
[root@root lib64]# cp libfastcommon.so /usr/lib
[root@root lib64]# cd /usr/lib
[root@root lib]# ls libfastcommon.*
libfastcommon.so

3.安装FastDFS

#解压
[root@root fastDFS]# tar -zxvf FastDFS_v5.05.tar.gz
[root@root fastDFS]# cd FastDFS/
[root@root FastDFS]# ls
client conf fastdfs.spec init.d make.sh README.md stop.sh test
common COPYING-3_0.txt HISTORY INSTALL php_client restart.sh storage tracker
#编译
[root@root FastDFS]# ./make.sh
#安装
[root@root FastDFS]# ./make.sh install

4. 配置tracker节点

[root@root FastDFS]# cd conf/
[root@root conf]# ls
anti-steal.jpg client.conf http.conf mime.types storage.conf storage_ids.conf tracker.conf
#拷贝所有配置文件到 /etc/fdfs目录下
[root@root conf]# cp * /etc/fdfs/
[root@root conf]# cd /etc/fdfs/
[root@root fdfs]# ls
anti-steal.jpg client.conf.sample mime.types storage.conf.sample tracker.conf
client.conf http.conf storage.conf storage_ids.conf tracker.conf.sample
#修改tracker配置文件修改存储和日志路径
[root@root fdfs]# vim tracker.conf
# the base path to store data and log files
base_path=/fastdfs/tracker
#创建存储路径,顺带创建storage和client存储路径
[root@root /]# mkdir /fastdfs/tracker -p
[root@root fastdfs]# mkdir storage
[root@root fastdfs]# mkdir client
#进入usr/bin文件夹,以/etc/fdfs/tracker.conf配置文件启动tracker
[root@root bin]# /usr/bin/fdfs_trackerd /etc/fdfs/tracker.conf start
#重启
[root@root bin]# /usr/bin/fdfs_trackerd fdfs_trackerd /etc/fdfs/tracker.conf restart

5. 配置storage节点

[root@root bin]# cd /etc/fdfs/
#编辑storage配置文件,修改以下配置
[root@root fdfs]# vim storage.conf
group_name=joey #组名,可根据实际情况修改,
base_path=/fastdfs/storage #设置storage数据文件和日志目录,需预先创建
store_path0=/fastdfs/storage #存储路径
tracker_server=192.168.116.145:22122 # #tracker 服务器的 IP地址和端口号,如果是单机搭建,IP不要写127.0.0.1,否则启动不成功。
#启动storage
[root@root bin]# /usr/bin/fdfs_storaged /etc/fdfs/storage.conf
#重启storage
[root@root bin]# /usr/bin/fdfs_storaged /etc/fdfs/storage.conf restart

6. 配置client

#编辑client,修改存储路径和tracker_server为本机IP
[root@root fdfs]# vim client.conf
# the base path to store log files
base_path=/fastdfs/client
# tracker_server can ocur more than once, and tracker_server format is
# "host:port", host can be hostname or ip address
tracker_server=192.168.1.20:22122

7. 测试

[root@root home]# /usr/bin/fdfs_test /etc/fdfs/client.conf upload /home/guanli.png 
This is FastDFS client test program v5.05

Copyright (C) 2008, Happy Fish / YuQing

FastDFS may be copied only under the terms of the GNU General
Public License V3, which may be found in the FastDFS source kit.
Please visit the FastDFS Home Page http://www.csource.org/
for more detail.

[2019-08-14 15:55:42] DEBUG - base_path=/fastdfs/client, connect_timeout=30, network_timeout=60, tracker_server_count=1, anti_steal_token=0, anti_steal_secret_key length=0, use_connection_pool=0, g_connection_pool_max_idle_time=3600s, use_storage_id=0, storage server id count: 0

tracker_query_storage_store_list_without_group:
server 1. group_name=, ip_addr=192.168.1.20, port=23000

group_name=joey, ip_addr=192.168.1.20, port=23000
storage_upload_by_filename
group_name=joey, remote_filename=M00/00/00/wKgBFF1Tvn6AL_ulAAhuqKakO_M091.png
source ip address: 192.168.1.20
file timestamp=2019-08-14 15:55:42
file size=552616
file crc32=2795781107
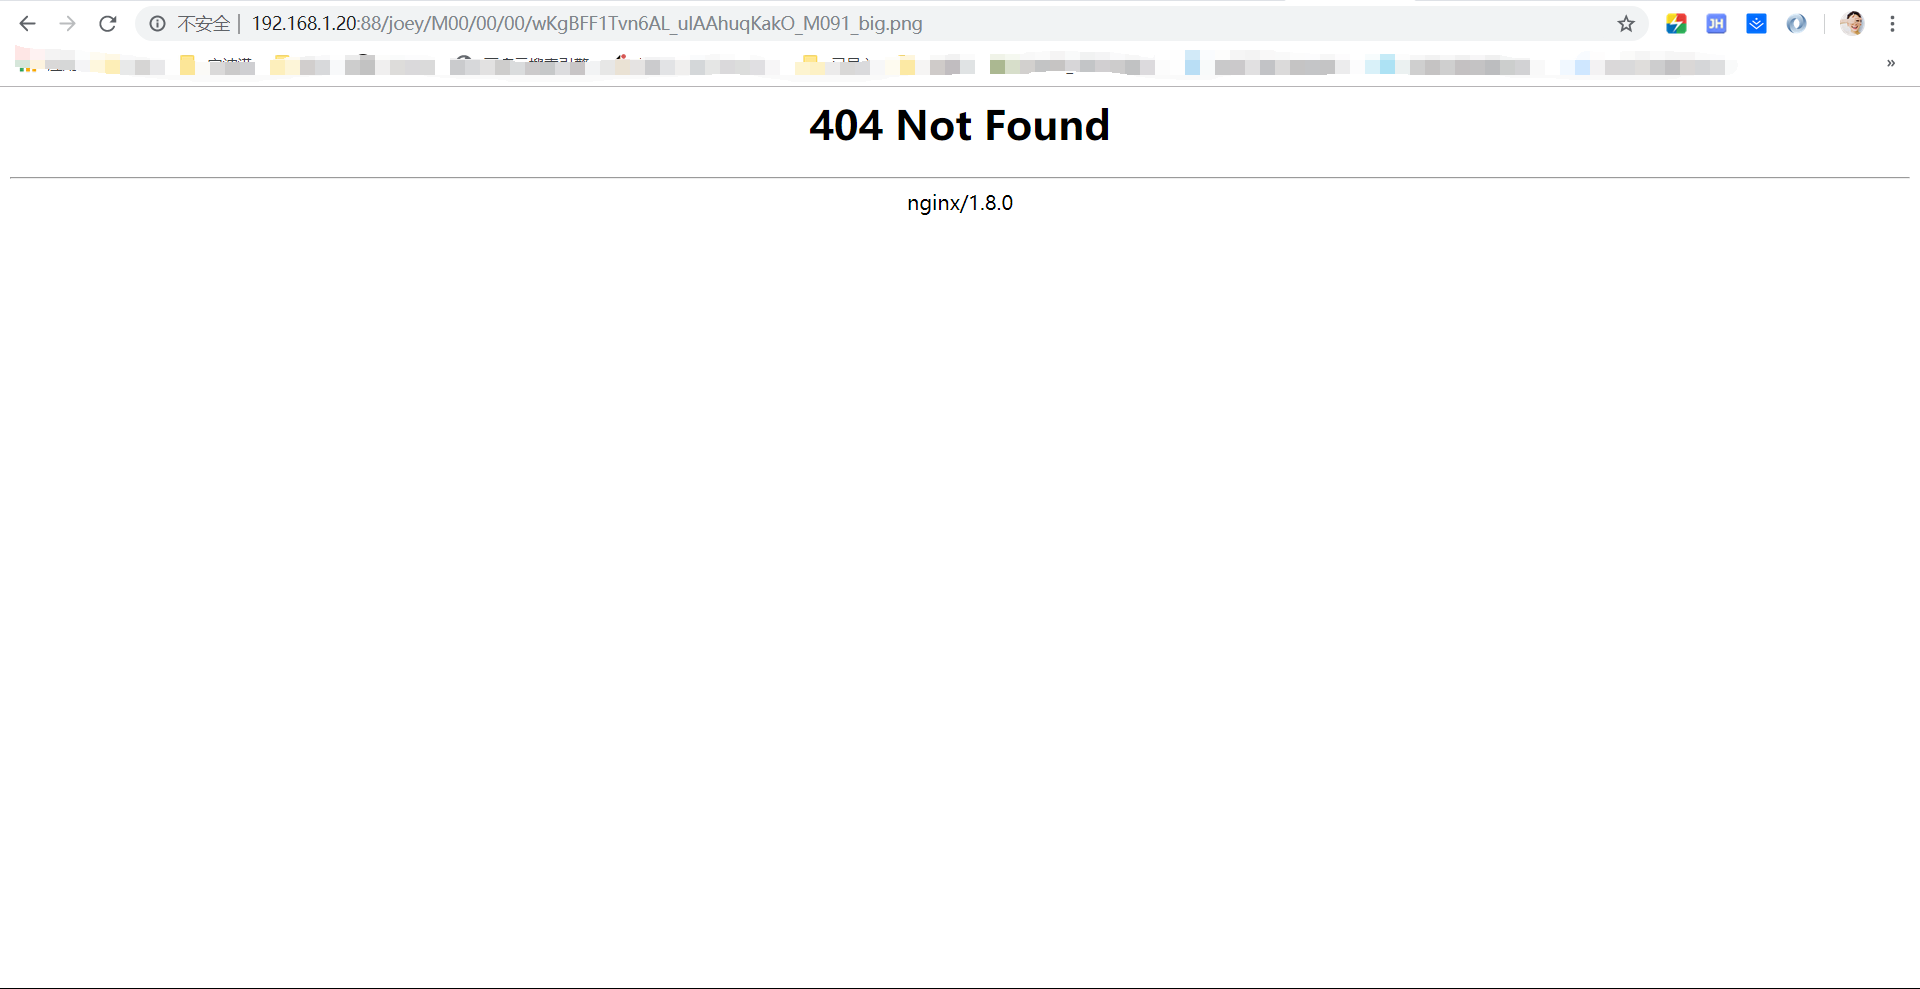
example file url: http://192.168.1.20/joey/M00/00/00/wKgBFF1Tvn6AL_ulAAhuqKakO_M091.png
storage_upload_slave_by_filename
group_name=joey, remote_filename=M00/00/00/wKgBFF1Tvn6AL_ulAAhuqKakO_M091_big.png
source ip address: 192.168.1.20
file timestamp=2019-08-14 15:55:42
file size=552616
file crc32=2795781107
example file url: http://192.168.1.20/joey/M00/00/00/wKgBFF1Tvn6AL_ulAAhuqKakO_M091_big.png
#返回链接就是成功了,但是还是访问不了,需要安装nginx服务器

8. 安装nginx

#解压安装fastdfs-nginx-module
[root@root fastDFS]# tar -zxvf fastdfs-nginx-module_v1.16.tar.gz
# 编辑 Nginx 模块的配置文件
# 复制配置文件至/etc/fdfs/,编辑config文件删除路径中的local
[root@root src]# cp * /etc/fdfs/
[root@root src]# vim /fastdfs-nginx-module/src/config
ngx_addon_name=ngx_http_fastdfs_module
HTTP_MODULES="$HTTP_MODULES ngx_http_fastdfs_module"
NGX_ADDON_SRCS="$NGX_ADDON_SRCS $ngx_addon_dir/ngx_http_fastdfs_module.c"
CORE_INCS="$CORE_INCS /usr/include/fastdfs /usr/include/fastcommon/"
CORE_LIBS="$CORE_LIBS -L/usr/lib -lfastcommon -lfdfsclient"
CFLAGS="$CFLAGS -D_FILE_OFFSET_BITS=64 -DFDFS_OUTPUT_CHUNK_SIZE='256*1024' -DFDFS_MOD_CONF_FILENAME='\"/etc/fdfs/mod_fastdfs.conf\"'"
#安装nginx依赖
[root@root fastDFS]# yum install -y pcre pcre-devel
[root@root fastDFS]# yum install -y zlib zlib-devel
[root@root fastDFS]# yum install -y openssl openssl-devel
# 解压nginx wget http://nginx.org/download/nginx-1.8.0.tar.gz
[root@root fastDFS]# tar -zxvf nginx-1.8.0.tar.gz

#nginx配置记得修改最后的module路径
#复制粘贴在nginx目录下执行
[root@root nginx-1.8.0]# ./configure \
> --prefix=/usr/local/nginx \
> --pid-path=/var/local/nginx/nginx.pid \
> --lock-path=/var/lock/nginx/nginx.lock \
> --error-log-path=/var/log/nginx/error.log \
> --http-log-path=/var/log/nginx/access.log \
> --with-http_gzip_static_module \
> --http-client-body-temp-path=/var/temp/nginx/client \
> --http-proxy-temp-path=/var/temp/nginx/proxy \
> --http-fastcgi-temp-path=/var/temp/nginx/fastcgi \
> --http-uwsgi-temp-path=/var/temp/nginx/uwsgi \
> --http-scgi-temp-path=/var/temp/nginx/scgi \
> --add-module=/opt/fastDFS/fastdfs-nginx-module/src

#编译
[root@root nginx-1.8.0]# make
#安装
[root@root nginx-1.8.0]# make install

#查看安装文件
[root@root nginx-1.8.0]# cd /usr/local/
[root@root local]# ls
bin etc games include lib lib64 libexec nginx sbin share src

#复制粘贴配置文件
[root@root local]# cd /opt/fastDFS/fastdfs-nginx-module/src/
[root@root src]# ls
common.c common.h config mod_fastdfs.conf ngx_http_fastdfs_module.c
[root@root src]# cp mod_fastdfs.conf /etc/fdfs/
[root@root src]# vim /etc/fdfs/mod_fastdfs.conf
#修改日志存储路径
# the base path to store log files
base_path=/fastdfs/tmp
#修改tracker路径
# FastDFS tracker_server can ocur more than once, and tracker_server format is
# "host:port", host can be hostname or ip address
# valid only when load_fdfs_parameters_from_tracker is true
tracker_server=192.168.1.20:22122
# the group name of the local storage server
group_name=joey
# if the url / uri including the group name
# set to false when uri like /M00/00/00/xxx
# set to true when uri like ${group_name}/M00/00/00/xxx, such as group1/M00/xxx
# default value is false
# store_path#, based 0, if store_path0 not exists, it's value is base_path
# the paths must be exist
# must same as storage.conf
store_path0=/fastdfs/storage
#store_path1=/home/yuqing/fastdfs1
#编辑配置文件添加下面这段,注意nginx使用的配置文件是哪个,/usr/local/nginx/conf/nginx.conf
[root@root conf]# vim nginx.conf
server {
listen 88;
server_name 192.168.1.20 ;

location / {
nginx_fastdfs_module;
}
}
#检查
[root@root conf]cd /usr/local/nginx/sbin/
[root@root sbin]# ./nginx -t
ngx_http_fastdfs_set pid=33746
nginx: the configuration file /usr/local/nginx/conf/nginx.conf syntax is ok
nginx: [emerg] mkdir() "/var/temp/nginx/client" failed (2: No such file or directory)
nginx: configuration file /usr/local/nginx/conf/nginx.conf test failed
#[emerg] mkdir() "/var/temp/nginx/client" failed (2: No such file or directory)
#报错显示没有目录/var/temp/nginx/client

#去创建目录
[root@root sbin]# mkdir /var/temp/nginx -p
#再次检查
[root@root sbin]# ./nginx -t
ngx_http_fastdfs_set pid=33766
nginx: the configuration file /usr/local/nginx/conf/nginx.conf syntax is ok
nginx: configuration file /usr/local/nginx/conf/nginx.conf test is successful

#检查失败,访问失败,去查看防火墙状态:active (running)
[root@root sbin]# sudo systemctl status firewalld
● firewalld.service - firewalld - dynamic firewall daemon
Loaded: loaded (/usr/lib/systemd/system/firewalld.service; enabled; vendor preset: enabled)
Active: active (running) since 三 2019-08-14 11:34:40 CST; 5h 51min ago
Docs: man:firewalld(1)
Main PID: 771 (firewalld)
Tasks: 2
CGroup: /system.slice/firewalld.service
└─771 /usr/bin/python -Es /usr/sbin/firewalld --nofork --nopid

8月 14 11:34:38 root systemd[1]: Starting firewalld - dynamic firewall daemon...
8月 14 11:34:40 root systemd[1]: Started firewalld - dynamic firewall daemon.
#暂时关闭防火墙,下次重启会失效或者disable
[root@root sbin]# sudo systemctl stop firewalld

访问nginx成功

访问图片失败

#修改配置
[root@root fdfs]# vim mod_fastdfs.conf
# store_path#, based 0, if store_path0 not exists, it's value is base_path
# the paths must be exist
# must same as storage.conf
store_path0=/fastdfs/storage
#store_path1=/home/yuqing/fastdfs1
#重启所有服务
[root@root fdfs]# /usr/bin/fdfs_trackerd /etc/fdfs/tracker.conf restart
waiting for pid [28338] exit ...
starting ...
[root@root fdfs]# /usr/bin/fdfs_storaged /etc/fdfs/storage.conf restart
waiting for pid [28841] exit ...
starting ...
[root@root fdfs]# cd /usr/local/nginx/sbin/
[root@root sbin]# ./nginx -s reload
ngx_http_fastdfs_set pid=34197

图片访问成功